Rendering CT scan animations in the cloud
A deep dive into how we use React Three Fiber and hardware accelerated headless browsers to render CT scan animations server-side.

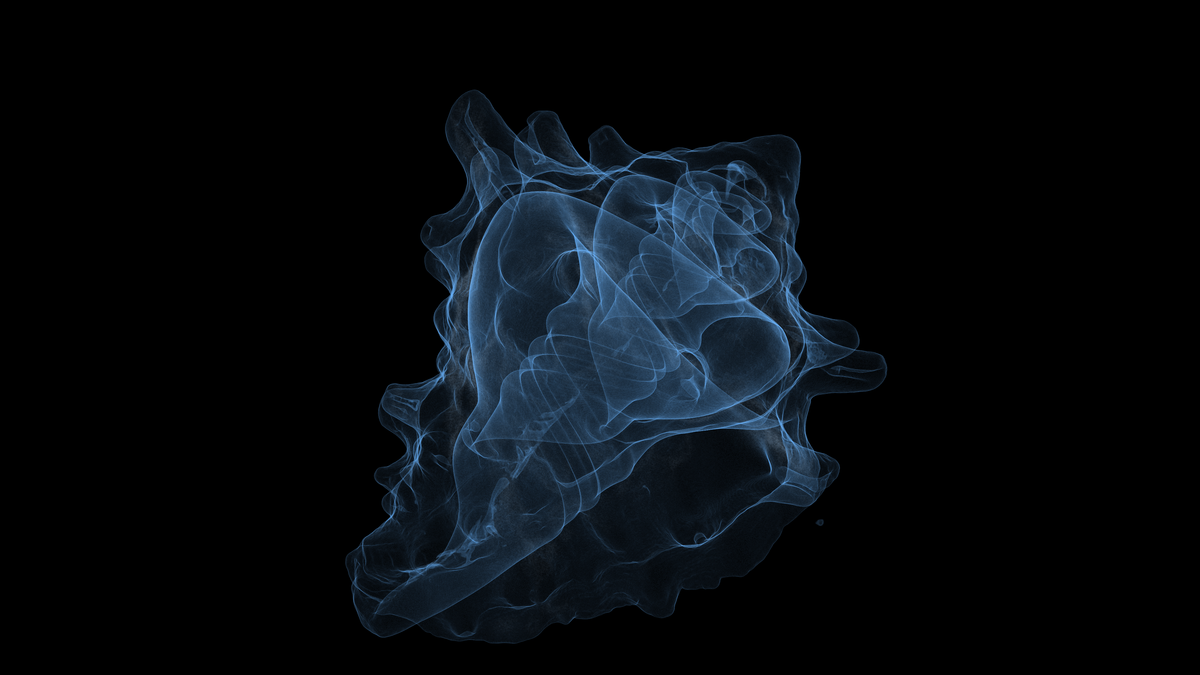
A single image or video of an industrial CT scan can be a silver bullet when diagnosing defects in manufactured parts. (Plus they're so pretty!) We built animation & render tools to enable users to quickly create and share visuals from scans taken on their Neptune and Triton scanners; this is a technical deep dive into how we built the feature.
A scrub through an Apple Vision Pro scanned on a Lumafield Neptune.
We had two primary product requirements:
- The visuals needed to be rendered server-side.
Lumafield Triton scanners operate at the speed of a factory floor. Rendering visuals server-side enables Voyager to run complex analyses on every part coming off a line and then snap images and videos highlighting anything out-of-spec, all without a human in the loop.
- The visuals needed to match our Three.js application.
Voyager uses Three.js and GLSL shaders to render industrial CT scans and analysis results. It has many visualization controls including attenuation range mapping, opacity, color maps, and cropping. We wanted to ensure users could define animations with the same range of visualization controls they were already comfortable with and preview their animations in the browser before downloading.

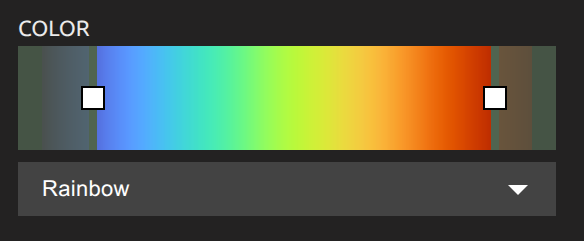
Voyager's attenuation histogram and color mapping visualization controls.
These two requirements already put us in a pickle: we need a web browser to run the existing Javascript which renders scans, but we need to run that browser server-side! Luckily there’s a solution: headless browsers.
Authoring animations
Before we dive into the headless browser, let's quickly cover the first step in our render pipeline: authoring an animation. Users choose an animation type and define their animation with a familiar timeline UX. After submitted an animation they can specify desired settings and request a download, which kicks off the render task that opens a headless browser.
Authoring an animation in Voyager.
Spinning up a headless browser
A headless browser is a browser that runs without a GUI. They are primarily used for running end-to-end tests in continuous integration pipelines but have a wide range of other use cases, from web scraping to the emerging space of agentic AI browsing.
Once upon a time attempting to run WebGL applications in a headless browser was a Sisyphean effort, but the underlying technology has come a long way in recent years. In particular, Google moved Headless Chrome from a separate implementation to a shared code path with Chrome itself in 2023, so that the difference between headless and headful mode is now just whether windows are created.
When a user requests a render of their animation, we open a headless browser using Playwright and navigate to voyager.lumafield.com. It may sound crazy, but using a headless browser to open our own application solves our initial quandary: we can re-use all of our existing rendering & animation code to produce the visuals in the cloud!
Here's how we fire up the headless browser:
with tempfile.TemporaryDirectory() as temporary_directory:
    with playwright.sync_api.sync_playwright() as p:
        browser = p.chromium.launch(args=chromium_flags)
        context = browser.new_context()
        context.add_cookies(auth_token_cookie)
        page = context.new_page()
        page.goto(project_url)
A snippet of the Python code we use to launch a Playwright browser.
A few things to note:
- We use the synchronous version of the Python Playwright API because we run the task in a Celery worker, which doesn't support
asyncio. (We'll revisit thechromium_flagsargument in the Hardware Acceleration section). - We wrap our browser script in a temporary directory so we can save downloaded files (our video frames!) for access outside the browser context:
def save_to_temporary_directory(download: playwright.sync_api.Download):
    filepath = os.path.join(
        temporary_directory, download.suggested_filename
    )
    download.save_as(filepath)

page.on("download", save_to_temporary_directory)
A "download" listener that saves files from the headless browser to a temporary directory.
- Just like a regular user, our headless browser needs an auth token to access authenticated routes, so we create one and manually inject it into the context as a cookie.
- The headless browser injects a query parameter into the URL it visits, which notifies the frontend that a render is being requested. Voyager opens the requested asset and begins downloading frames.
Downloading frames
To render high-resolution videos, we save images frame-by-frame and stitch together the video at the end. React Three Fiber powers the viewports in Voyager, and we take advantage of useFrame to hook into the frame loop and download each frame. Here's the play-by-play:
- Create a new
CanvasRenderingContext2Dto paint our frames onto.
const canvas = document.createElement("canvas");
canvas.width = render.width;
canvas.height = render.height;
const context = canvas.getContext("2d");
const { r, g, b, a } = render.color;
context.fillStyle = `rgba(${r} ${g} ${b} ${a})`
Initializing a new <canvas/> to get a 2D rendering context with a specified size.
<canvas/> to render the Three.js scene? Yes, but there are two additional layers we want to add: HTML overlays and a watermark. The simplest way to paint these to a canvas is with drawImage() function on CanvasRenderingContext2D. The canvas containing our Three.js scene already has a WebGLRenderingContext, and you can only get one type of drawing context from each canvas. So, we create a new canvas to get a 2D context.
- Resize our
WebGLRenderingContextto the requested dimensions withgl.setSize().
Then, for each frame of the animation, we proceed through the following steps:
- Reset the 2D context.
context.clearRect(0, 0, width, height);
context.beginPath();
context.fillRect(0, 0, width, height);- Render the current Three.js scene with
gl.render(scene, camera). - Draw the Three.js scene on the 2D context.
- Draw additional layers (HTML overlays & watermark) on the 2D context.
- Download the finished frame with
toDataURLand an a<a/>tag.
const download = (canvas: HTMLCanvasElement, filename: string) => {
    const a = document.createElement('a');
    const url = canvas.toDataURL();
    a.href = url;
    a.download = filename;
    a.click();
    URL.revokeObjectURL(url);
    a.remove();
}
A utility function to download the contents of a <canvas/>.
- Step the animation forward (we won't cover the details of our animation implementation itself here).
- Request a new animation frame with React Three Fiber's
invalidate().
Putting it all together, here's the frame loop we use to download frames:
useFrame(() => {
    context.clearRect(0, 0, width, height);
    context.beginPath();
    context.fillRect(0, 0, width, height);
    gl.render(scene, camera);
    context.drawImage(gl.domElement, 0, 0, width, height);
    context.drawImage(overlays, 0, 0, width, height);
    context.drawImage(watermark, watermarkX, watermarkY, watermarkWidth, watermarkHeight);
    download(context.canvas, `frame-${savedFrames}`);
    setSavedFrames(savedFrames + 1);
    advanceAnimation(savedFrames / totalFrames);
    invalidate();
}, RENDER_PRIORITY);
A React Three Fiber frame loop effect to download animation frames.
Note the RENDER_PRIORITY argument passed to useFrame (a constant integer); this takes over the frame loop, which is why we have to manually invalidate each frame. It's also worth calling out that we're doing a lot of work in the frame loop here; drawImage is an expensive call. As the React Three Fiber docs call out, running computationally expensive code run on a frame loop is generally a bad idea:

But this is a rare case where holding up the frame loop until each frame is done is exactly what we want. This is a render, not an interactive experience, and we need to freeze the scene until we've downloaded each file.
Compiling videos
Once all the frames have been downloaded, we close our Playwright browser, read the frames from the temporary directory, and use ffmpeg to compile them into a final video with the requested settings (compression, format, etc). This gets saved to the database and sent back to the user requesting the video. All done!
Hardware acceleration
We released a beta version of the feature and as feedback started rolling in, one thing became very clear: our renders were too slow. We were initially running the Playwright task on CPU machines, and even on very powerful instances, rendering hundreds of high-resolution frames took 20 minutes or more. So we set sail into the world of hardware acceleration.
Hardware acceleration in Headless Chrome
This article on the Chrome for Developers blog explains how to enable hardware acceleration in Headless Chrome on Linux (which we'll assume throughout this tutorial) and confirm that it’s working. It requires passing two sets of flags to the browser: one to enable WebGL and WebGPU and another to force the headless browser to use Vulkan. (So you'll also need to install vulkantools and libvulkan-dev locally.)
Here's a simple Javascript file that opens a hardware accelerated chromium browser with Playwright and downloads a report of the GPU:
import * as playwright from "playwright";
const browser = await playwright.chromium.launch({
  args: [
    "--no-sandbox",
    "--enable-webgl",
    "--enable-gpu",
    "--use-angle=vulkan",
    "--enable-features=Vulkan",
    "--disable-vulkan-surface",
  ],
  channel: "chromium",
});
const page = await browser.newPage();
await page.goto("chrome://gpu", { waitUntil: "domcontentloaded" });
await page.pdf({ path: "./gpu.pdf" });
await browser.close();
A simple Playwright script that saves a PDF report of the chrome://gpu debug page.
To understand what these flags do, you can run a simple experiment. Run the script above with three different tiers of flags:
- No flags; just call
playwright.chromium.launch(). - Add flags to enabled hardware acceleration (
"--enable-webgl"and"--enable-gpu"). - Add flags to require Vulkan (
"--use-angle=vulkan","--enable-features=Vulkan",--disable-vulkan-surface)
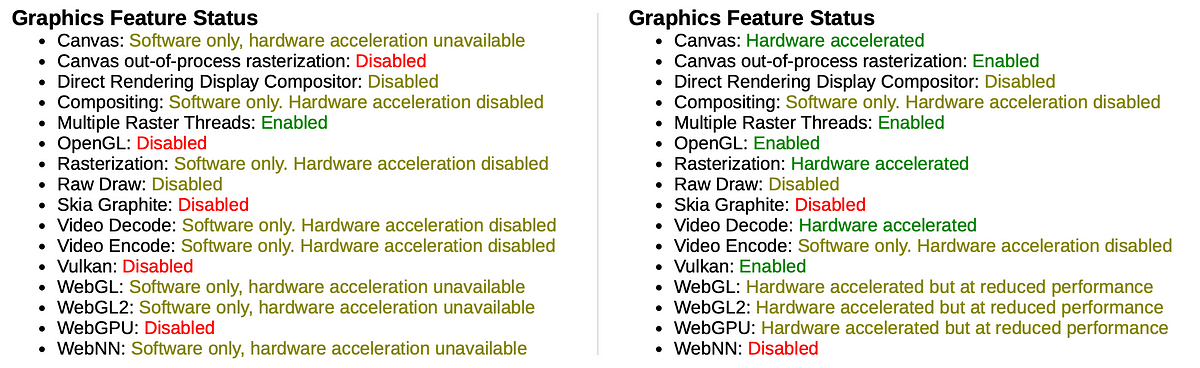
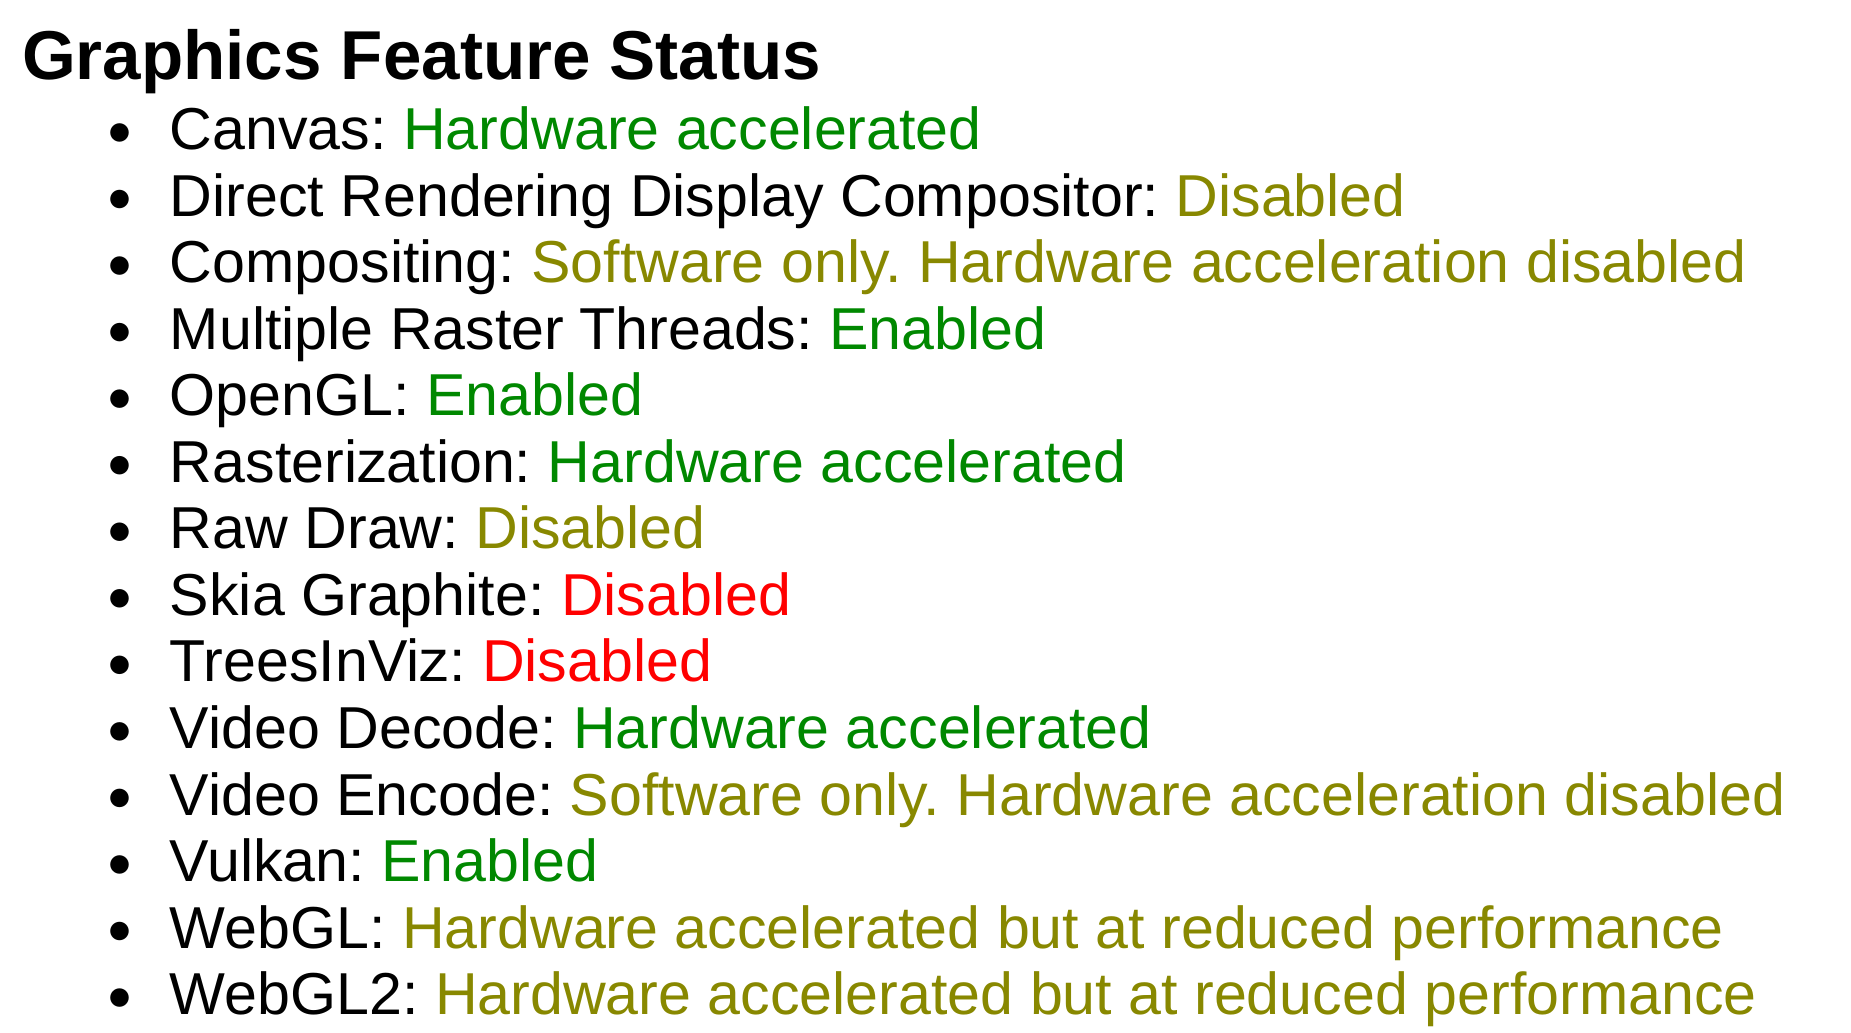
Here is the resulting gpu.pdf for each set of flags:
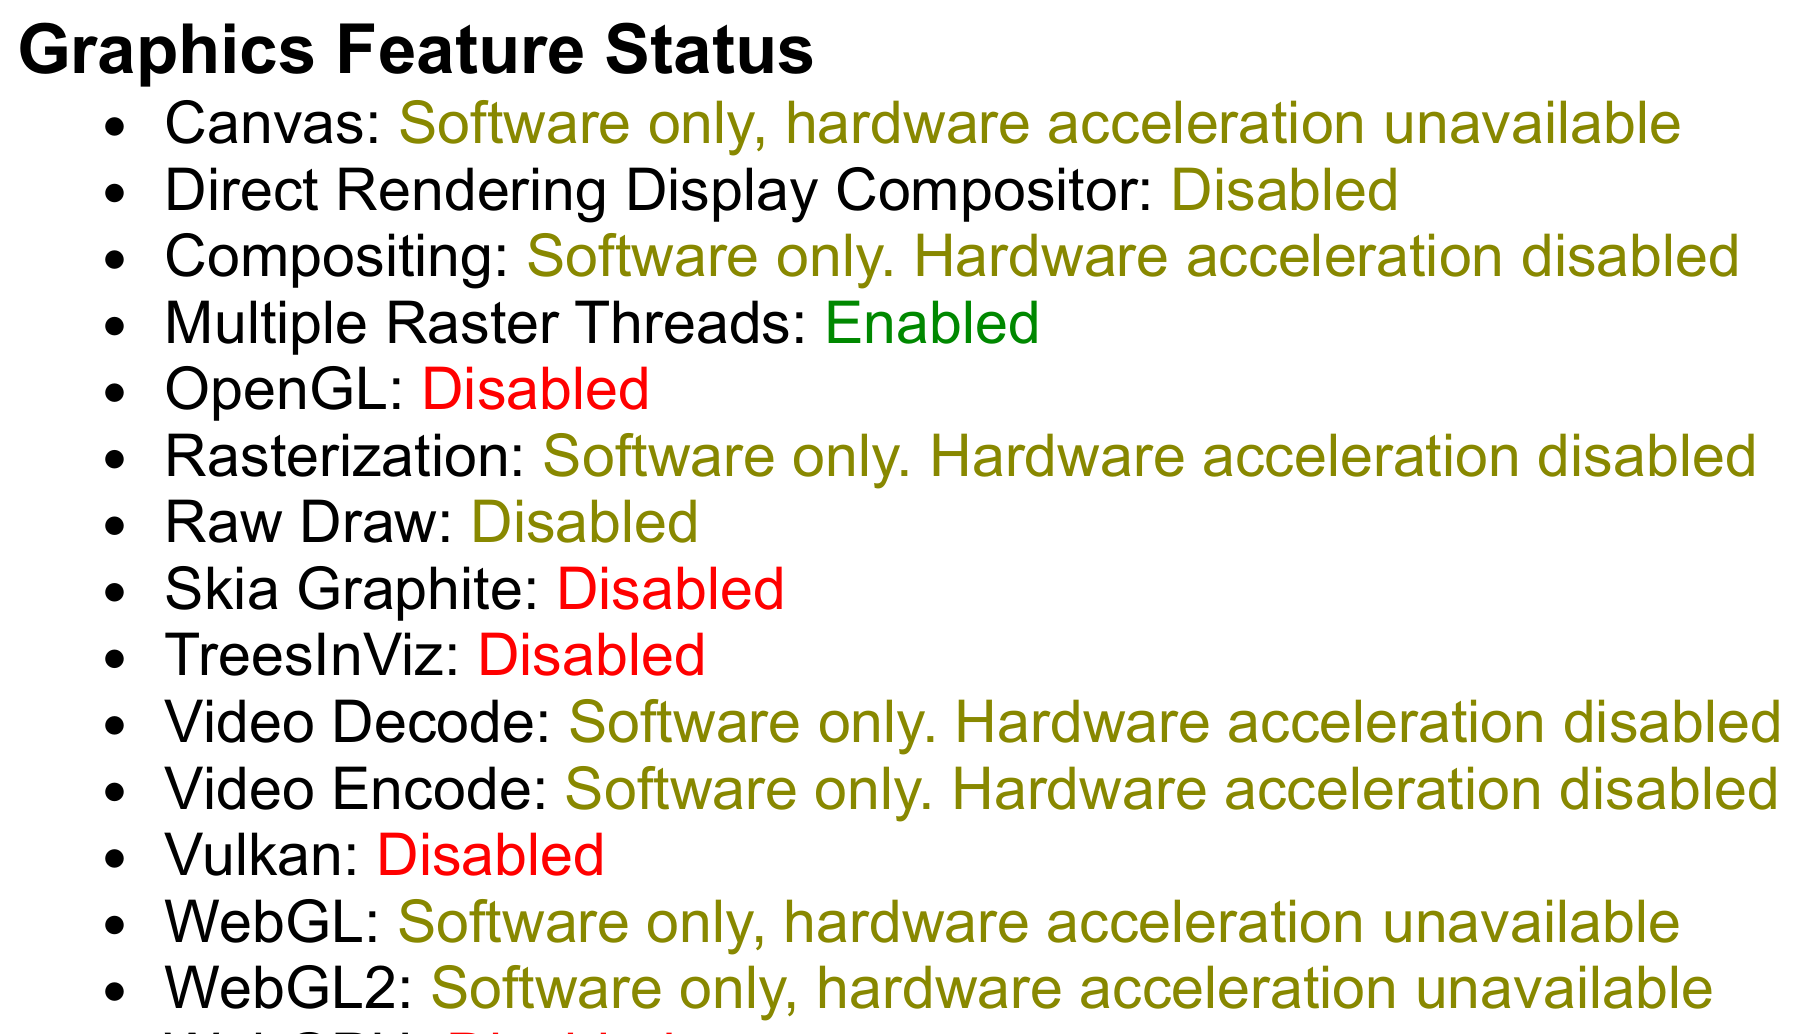
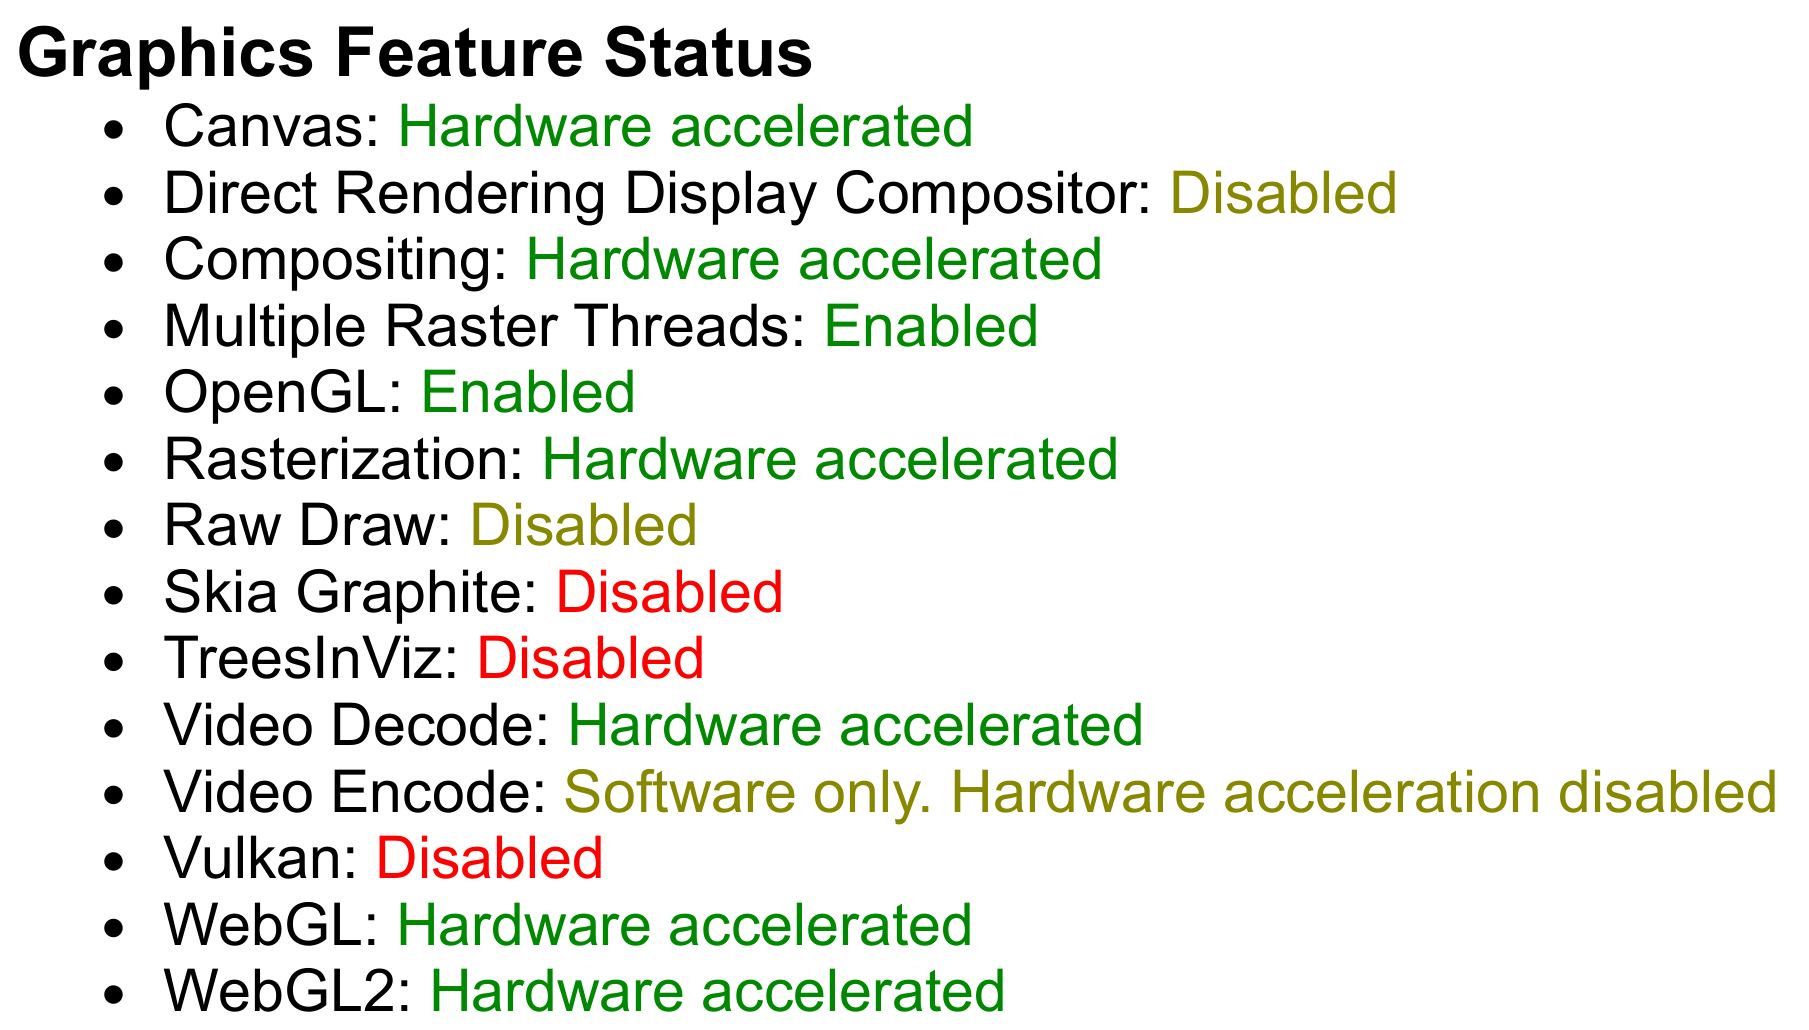
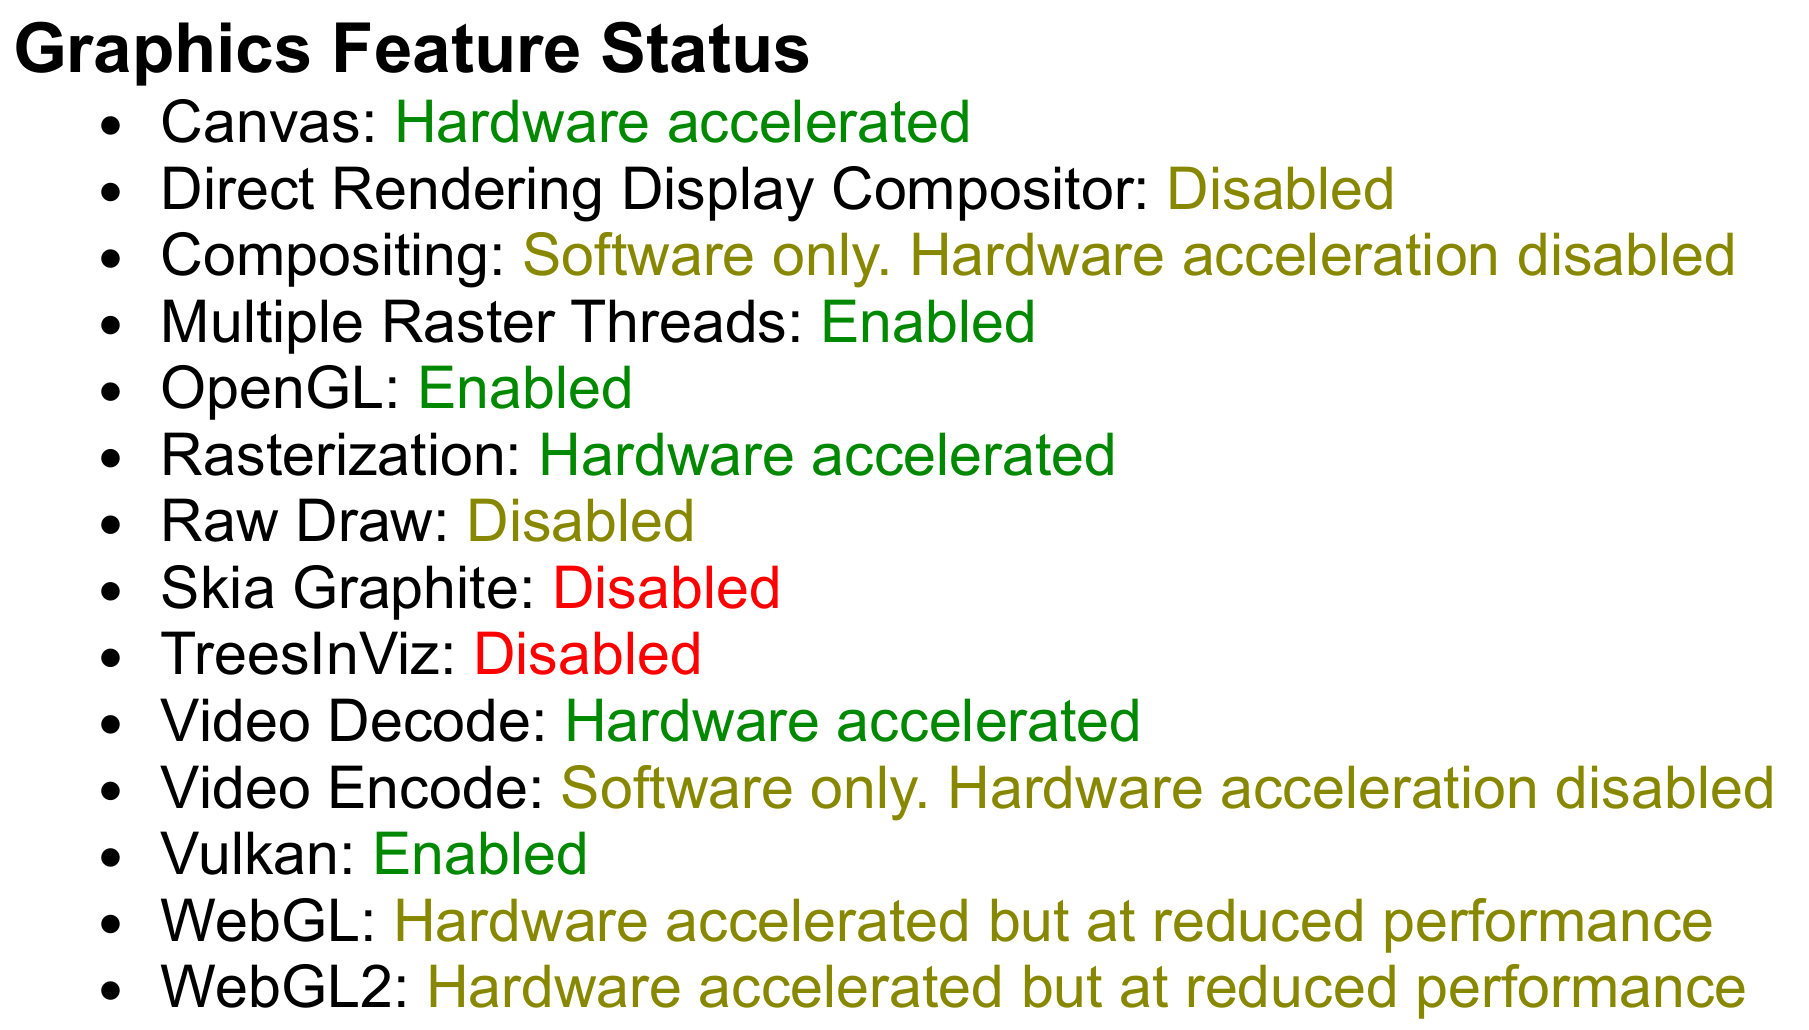


The Chrome GPU settings for our three experiments, respectively.
- As expected, with no hardware acceleration flags the Canvas and WebGL2 features are both Software only. The
GL_RENDERERis set to SwiftShader, Google's CPU-based fallback implementation of the Vulkan API. - When we enable WebGL and the GPU, the Canvas and WebGL2 features now report Hardware accelerated. Nice! However, Vulkan is Disabled. Taking a look at
GL_RENDERER, we've upgraded from SwiftShader to an Intel graphics card (the integrated graphics card on my device). Close, but no NVIDIA. - After this final set of flags, Vulkan is Enabled and the
GL_RENDERERis my blazing-fast NVIDIA GeForce RTX 4070. Sweet! (Interestingly, the Canvas and WebGL2 features now say that they are Hardware accelerated but at reduced performance; my understanding is that this is because we disabled Vulkan's surface implementation.)
Hardware accelerated Headless Chrome in a Docker container
Now that we’ve successfully gotten a headless browser to use an NVIDIA GPU for hardware acceleration, the next step is to do it inside a Docker container.
Exposing an NVIDIA device to a Docker container is pretty straightforward with the NVIDIA Container Toolkit, which has a detailed Installation Guide. Running nvidia-smi inside our Docker container, we can confirm that it's being accessed.
But as we saw earlier, we also need to use Vulkan, which means we'll need to install vulkan-tools. Here is a Dockerfile that creates an environment for running our hardware accelerated Playwright browser:
FROM mcr.microsoft.com/playwright:v1.44.1-jammy

RUN apt-get update && apt-get upgrade -y \
    && rm -rf /var/lib/apt/lists/*

RUN apt-get update && apt-get install -y \
    libgl1 vulkan-tools \
    && rm -rf /var/lib/apt/lists/*

ENV NVIDIA_VISIBLE_DEVICES=all
ENV NVIDIA_DRIVER_CAPABILITIES=all

WORKDIR /app
COPY package*.json ./
RUN npm install
COPY . .

RUN npx playwright install --with-deps
A Dockerfile for running hardware accelerated Headless Chrome browsers via Playwright.
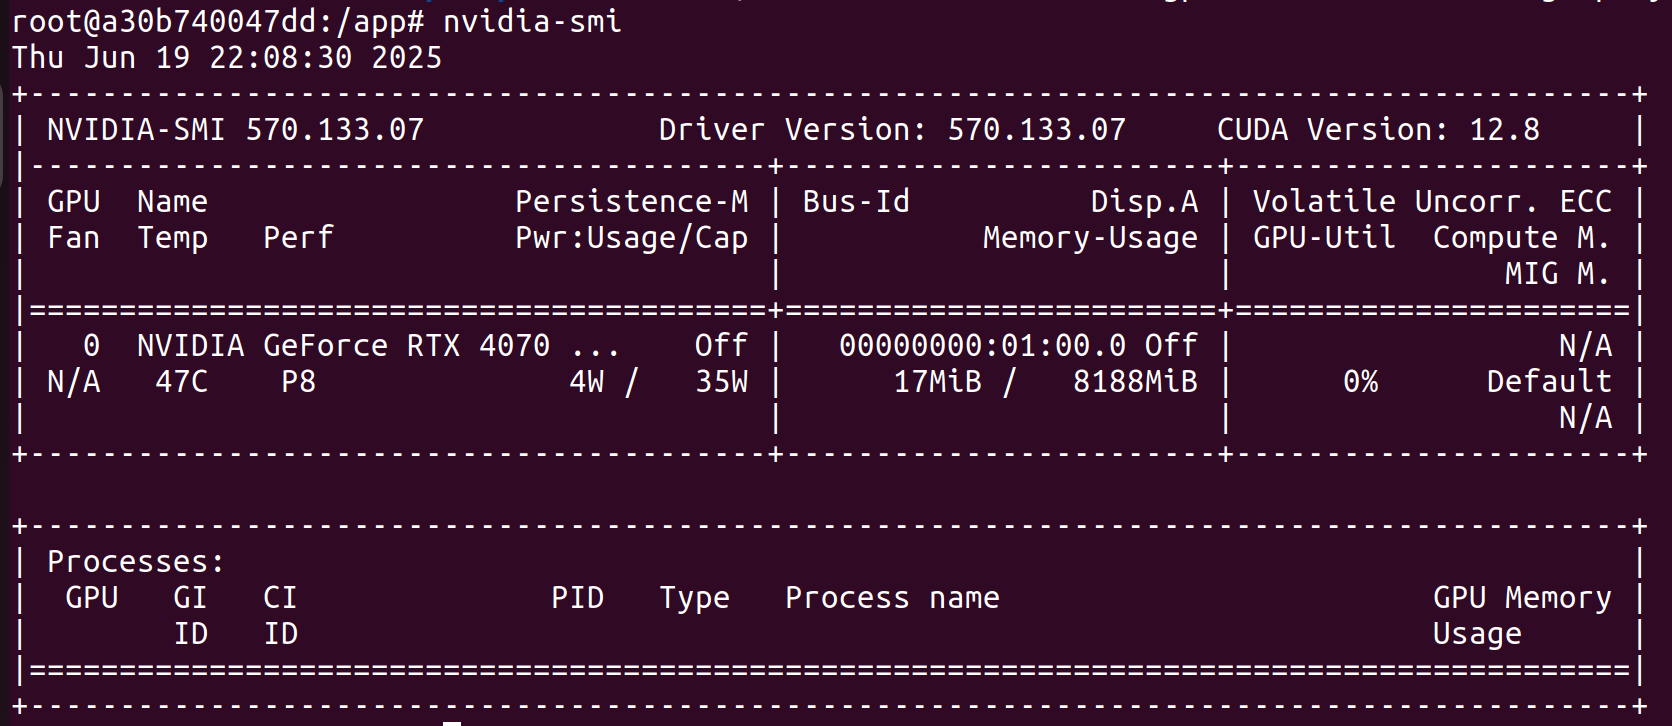
We can run this Dockerfile with docker run -it --rm --gpus all playwright-sandbox /bin/bash, and then we run nvidia-smi in the shell to confirm our GPU is exposed to the container:
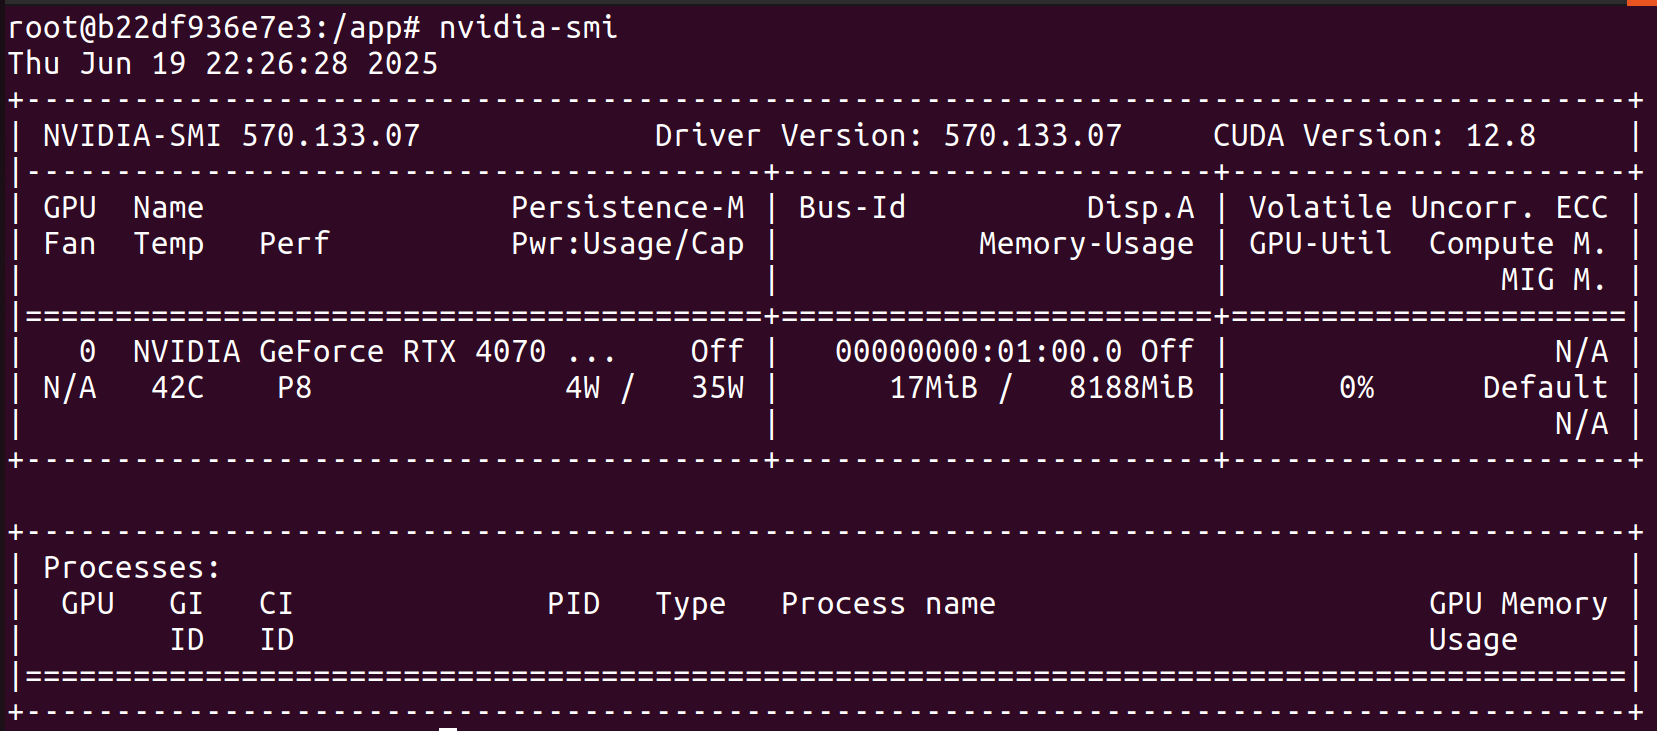
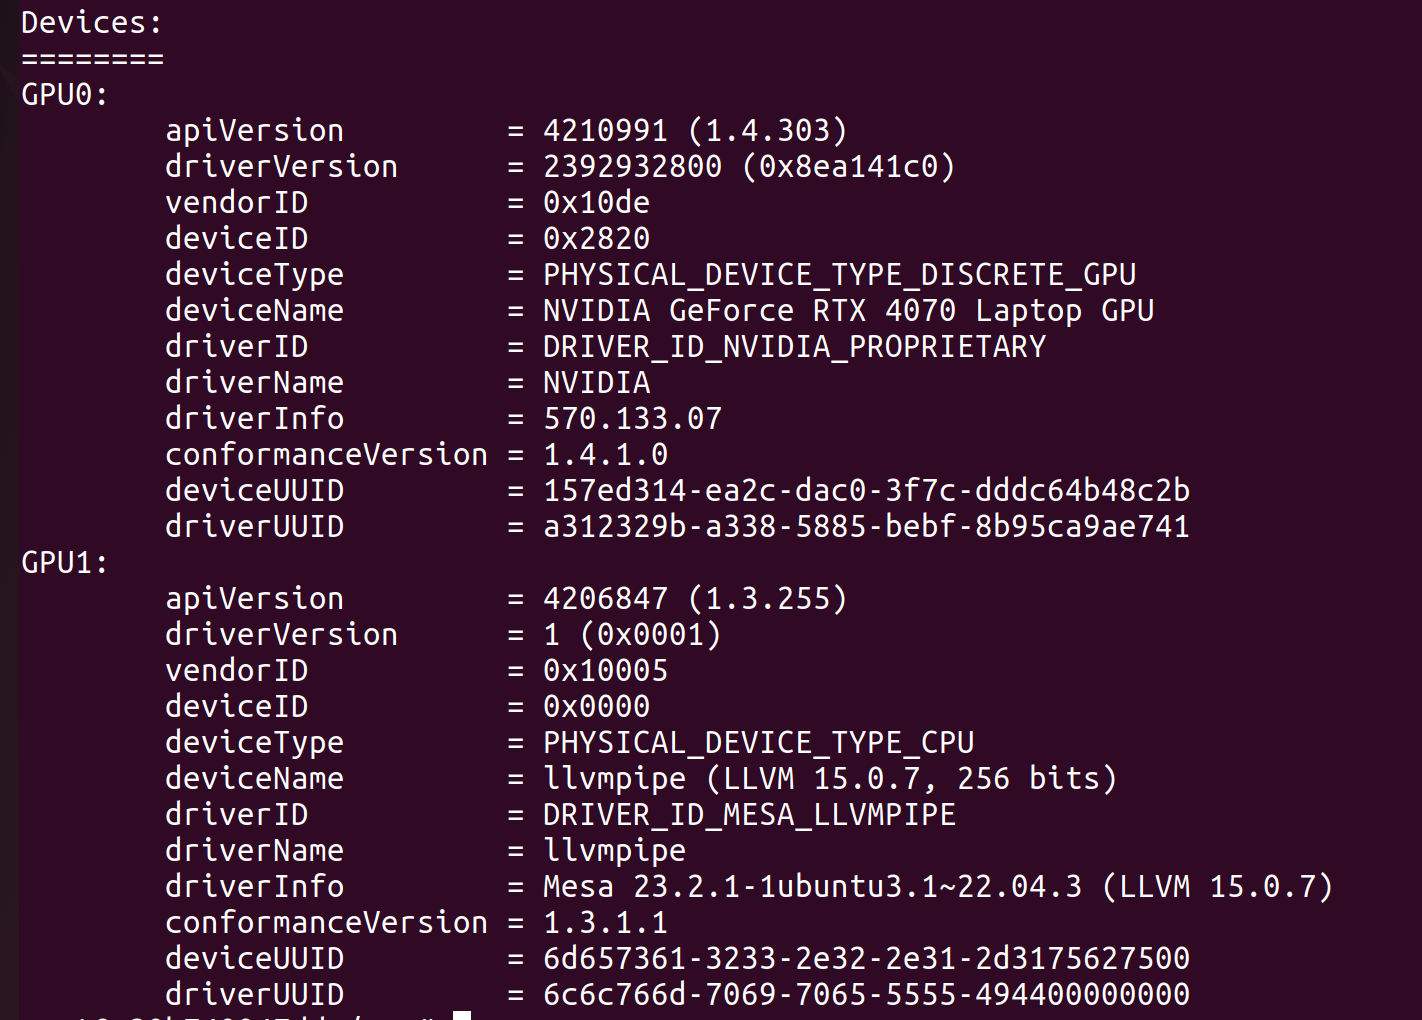
nvidia-smi in our playwright-sandbox container.Great! Looks like everything is in order with our GPU. Now let's check that Vulkan is discovering our GPU by running vulkaninfo --summary:
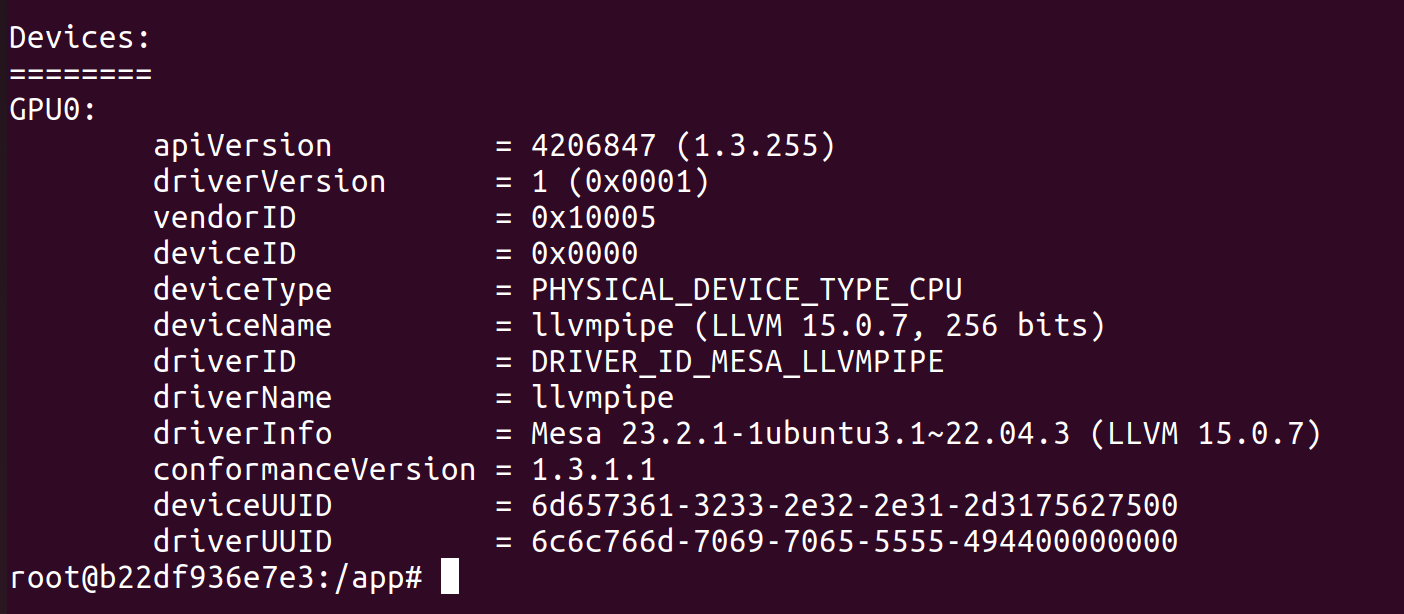
vulkaninfo --summary in our playwright-sandbox container.vulkaninfo lists only a single CPU device called llvmpipe!This is a thorny one but as it turns out, the link between Vulkan and NVIDIA is missing some configuration files. This GitHub repo provides a minimal Docker / Vulkan runtime and helped us trace the missing configuration files down.
Let's add these lines to our Dockerfile:
RUN cat > /etc/vulkan/icd.d/nvidia_icd.json <<EOF
{
    "file_format_version" : "1.0.0",
    "ICD": {
        "library_path": "libGLX_nvidia.so.0",
        "api_version" : "1.3.194"
    }
}
EOF
RUN mkdir -p /usr/share/glvnd/egl_vendor.d && \
    cat > /usr/share/glvnd/egl_vendor.d/10_nvidia.json <<EOF
{
    "file_format_version" : "1.0.0",
    "ICD" : {
        "library_path" : "libEGL_nvidia.so.0"
    }
}
EOF
RUN cat > /etc/vulkan/implicit_layer.d/nvidia_layers.json <<EOF
{
    "file_format_version" : "1.0.0",
    "layer": {
        "name": "VK_LAYER_NV_optimus",
        "type": "INSTANCE",
        "library_path": "libGLX_nvidia.so.0",
        "api_version" : "1.3.194",
        "implementation_version" : "1",
        "description" : "NVIDIA Optimus layer",
        "functions": {
            "vkGetInstanceProcAddr": "vk_optimusGetInstanceProcAddr",
            "vkGetDeviceProcAddr": "vk_optimusGetDeviceProcAddr"
        },
        "enable_environment": {
            "__NV_PRIME_RENDER_OFFLOAD": "1"
        },
        "disable_environment": {
            "DISABLE_LAYER_NV_OPTIMUS_1": ""
        }
    }
}
EOF
Additional lines added to our Dockerfile to write missing config files.
Now we re-build the Docker container and re-run vulkaninfo – summary:
The output of nvidia-smi and vulkaninfo --summary in our final playwright-sandbox Docker container, respectively.
Score! vulkaninfo is now discovering our NVIDIA device. By running our Playwright script from earlier, we can get a GPU report from inside our Docker container with Vulkan enabled and the proper settings for GL_RENDERER:

Hardware accelerated Headless Chrome in the cloud
Ok, we've got a hardware acceleration working in a Docker container; time to put it in the cloud! That should be pretty straightforward, right? That's the point of Docker containers after all...

We run our renders on g4dn.xlarge EC2 instances using Amazon Linux 2023. We first attempted to use an existing AMI that installed the latest version of the NVIDIA drivers (570 at time of writing), but quickly ran into issues with the Vulkan initialization related to a missing libGLX_nvidia.so.0.
After digging into the NVIDIA driver installation guide, we learned that starting with driver version 560 NVIDIA split their data center driver installs into desktop and compute and inexplicably dropped desktop support for Amazon Linux 2023:
Upgrading the driver on Amazon Linux 2023 to version 560 or newer will remove all the unused desktop components as part of the upgrade.
The AWS docs recommend manually installing the drivers with a Runfile to get around this:
NVIDIA driver version 560 or higher from NVIDIA repository supports compute only/headless mode but not desktop mode. Use Runfile installer (Method 2) if you need graphical desktop drivers and libraries.But unfortunately, NVIDIA no longer supports Runfile installations for Amazon Linux 2023:
1.3. Known Issues and Limitations: Runfile will not be supported for Amazon Linux 2023.
A close look at the driver repo confirms that there is exactly one driver version below the cutoff—version 555—and it is indeed the only driver which contains the nvidia-driver-libs, which includes all the desktop dependencies, including the missing libGLX.so.0 file:
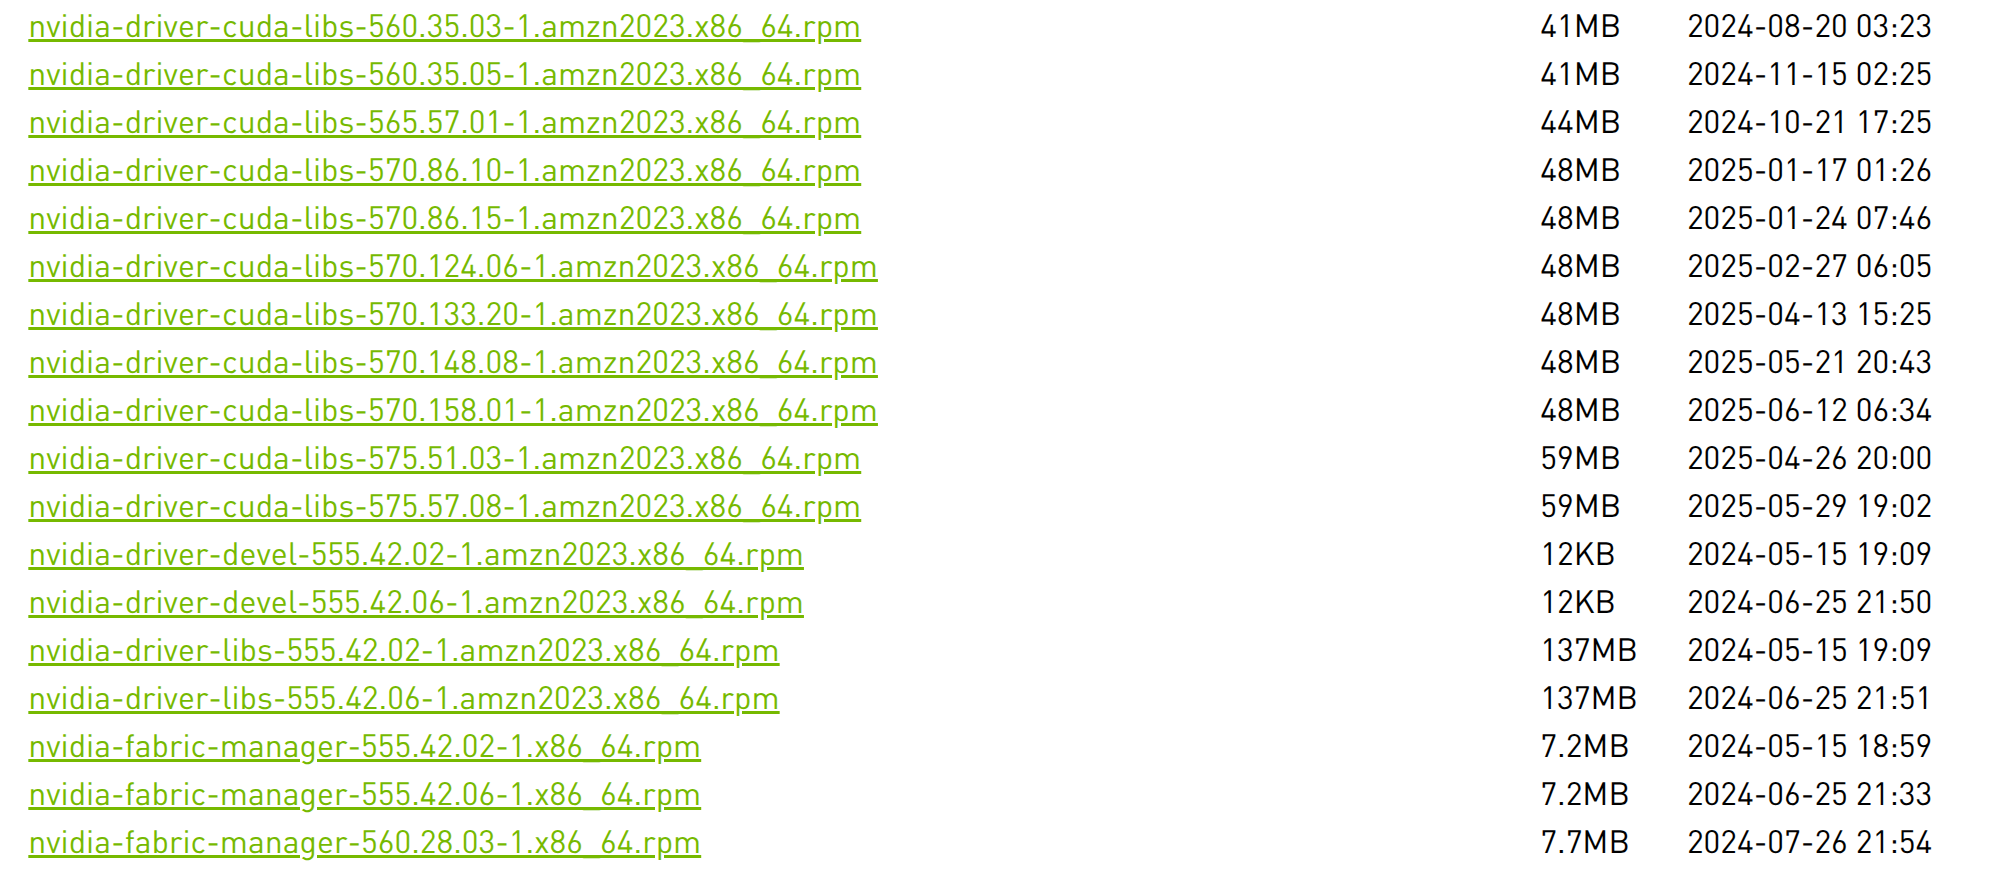
nvidia-driver-libs is only included for driver version 555.
So, as of writing, only the compute dependencies of the latest NVIDIA drivers are available for Amazon Linux 2023. We ended up defining a custom AMI which installs driver version 555 using this shell script:
sudo dnf install -y kernel-devel-$(uname -r) kernel-headers-$(uname -r) kernel-modules-extra-$(uname -r)
sudo dnf config-manager --add-repo https://developer.download.nvidia.com/compute/cuda/repos/amzn2023/x86_64/cuda-amzn2023.repo
sudo dnf clean expire-cache
sudo dnf module install -y nvidia-driver:555-dkms
sudo dnf install nvidia-container-toolkit -y
sudo dnf install -y nvidia-gds
sudo nvidia-ctk runtime configure --runtime=containerd --set-as-default
A shell script to install NVIDIA driver version 555 for an AMI.
Once we installed the correct driver version, the Vulkan initialization error was resolved. We used Kubernetes to exec into the pod in question and confirm our GPU was being discovered with vulkaninfo --summary:
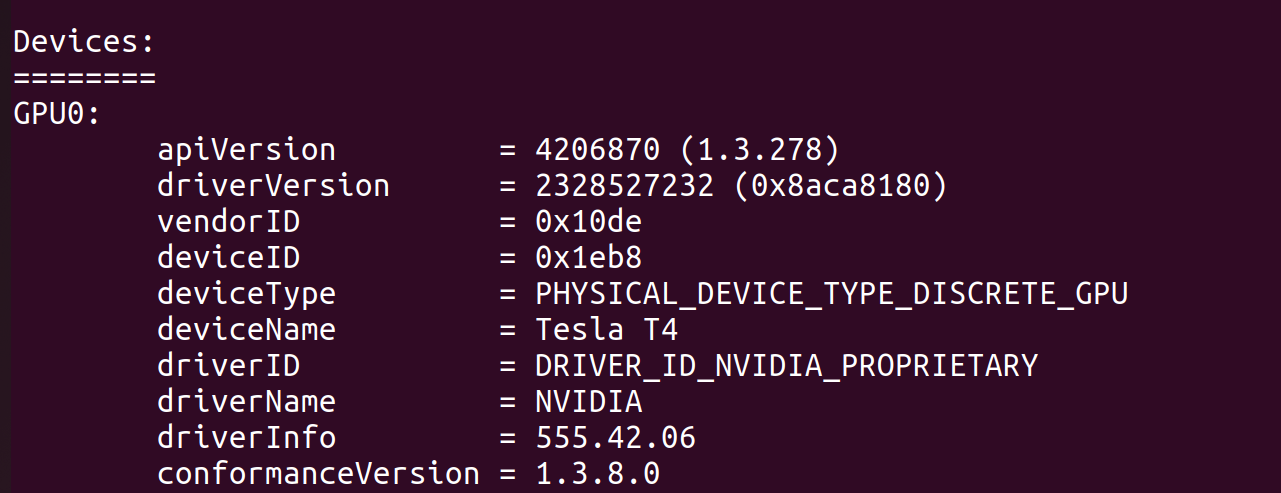
vulkaninfo --summary finding the Tesla T4 GPU inside of a g4dn.xlarge EC2 instance.Woohoo! That was a lot, but it's done: a Docker container, in the cloud, capable of running a hardware accelerated headless browser. At long last we could run a render with nvtop open see that sweet, sweet GPU usage start to rise:

nvtop running an a g4dn.xlarge EC2 instance during a render.And one last animation for the road...
An orbit animation of a Nike Alphafly 3 scanned on a Lumafield Neptune.
Additional Resources
The following articles were extremely helpful as we built out this feature: